
Homemade Pop-Tarts: A Fun and Flavorful Treat for Any Occasion
If you’re looking to elevate your breakfast or snack game, homemade pop-tarts are the perfect solution. With a few simple ingredients and a touch of creativity, you can create delicious pastries that surpass the store-bought variety. This recipe not only yields mouthwatering treats but also provides an enjoyable cooking experience, making it a fantastic family activity.
Ingredients:
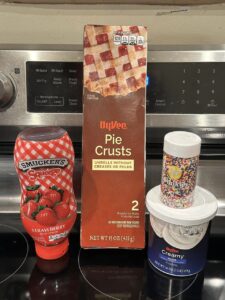
- 2 boxes of premade pie crust
- Strawberry jelly (or your favorite flavor)
- 1 egg
- Frosting (store-bought or homemade)
- Sprinkles
Instructions:
- Preheat the Oven: Preheat your oven to 425°F (220°C).
- Prepare the Pie Crusts: Lay out each pie crust and use a knife or a round cutter to cut out the desired size for your pop-tarts. You should have 16 pieces in total.
- Assemble the Pop-Tarts:
- Lay 8 of the pie crust pieces on a baking sheet lined with parchment paper.
- Spoon approximately 1 teaspoon of strawberry jelly (or your preferred flavor) onto the center of each crust piece.
- Spread the jelly evenly, leaving a small border around the edges.
- Top with Remaining Pie Crusts:
- Place the remaining 8 pie crust pieces on top of the jelly-covered ones.
- Use a fork to press down and seal the edges of each pop-tart, ensuring that the filling is enclosed.
- Poke Holes:
- Use a toothpick to poke a few holes in the top of each pop-tart. This helps steam escape during baking.
- Egg Wash:
- In a small bowl, beat the egg.
- Brush the egg wash over the top of each pop-tart. This gives them a golden-brown finish when baked.
- Bake:
- Bake the pop-tarts in the preheated oven for 7-8 minutes or until they are lightly golden brown.
- Cooling:
- Once done, transfer the pop-tarts to a wire cooling rack and let them cool completely.
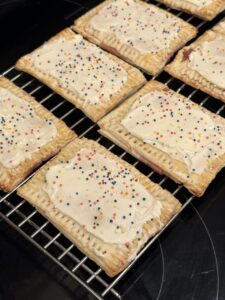
- Frosting and Sprinkles:
- Once cooled, spread frosting over the top of each pop-tart.
- Decorate with your favorite sprinkles while the frosting is still soft.
- Serve and Store:
- Enjoy the homemade pop-tarts immediately, or store them in the refrigerator. You can warm them up in a toaster when ready to eat.
- Variations:
- Feel free to experiment with different fillings, frostings, or toppings based on your preferences.
- Have Fun:
- Involve your kids in the process of assembling, decorating, and, of course, enjoying these delicious homemade treats!
Why You’ll Love It:
- Irresistible Flavors: Indulge in the rich, fruity burst of flavor from the homemade pop-tarts. With your choice of jelly, these pastries offer a delightful taste that surpasses store-bought alternatives.
- Customizable Creations: Tailor each pop-tart to your liking. Experiment with different fillings, frostings, and toppings to create a variety of personalized treats. Let your imagination run wild, making every batch unique and exciting.
- Family-Friendly Fun: The process of making homemade pop-tarts is not just about the end result—it’s a fantastic family activity. Engage your kids in the kitchen, allowing them to participate in assembling, decorating, and, of course, enjoying these scrumptious pastries.
- Quick and Easy: This recipe is a breeze to whip up, making it perfect for busy mornings or impromptu snack cravings. In just a short time, you can have a batch of warm, golden-brown pop-tarts ready to be savored.
- Versatile Treat: Whether you’re craving a delightful breakfast or a sweet pick-me-up during the day, homemade pop-tarts fit the bill. They can be enjoyed fresh out of the oven or reheated for a warm and comforting treat.
- Adaptable to Preferences: Adjust the recipe to suit your dietary preferences or restrictions. From gluten-free pie crusts to vegan-friendly fillings, you have the flexibility to create pop-tarts that align with your specific needs.
- Perfectly Portable: Grab a pop-tart on the go or pack them in lunchboxes. These homemade delights are not only delicious but also conveniently portable, making them an excellent option for busy lifestyles.
- Elevate Breakfast or Snack Time: Upgrade your breakfast routine or turn an ordinary snack into a moment of pure delight. Homemade pop-tarts bring a touch of warmth and sweetness to any occasion.
- Endless Creativity: With various shapes, colors, and flavor combinations at your disposal, making pop-tarts becomes a canvas for culinary creativity. Express yourself through edible artistry and revel in the joy of crafting your own delicious masterpieces.
- Nostalgic Comfort: Enjoy a nostalgic trip down memory lane with a homemade version of this beloved childhood classic. The aroma of freshly baked pop-tarts will evoke warm memories, making every bite a comforting experience.
How to store it :
Preserving the freshness and flavor of your homemade pop-tarts is crucial to ensure they remain a delightful treat whenever you decide to indulge. Here’s a simple guide on how to store them effectively:
- Cool Completely: Before thinking about storage, allow your homemade pop-tarts to cool completely. Placing warm pastries in storage can create condensation, leading to sogginess.
- Refrigeration: While homemade pop-tarts can be stored at room temperature for a day or two, it’s generally advisable to refrigerate them for longer shelf life. Place them in an airtight container or wrap them individually in plastic wrap before refrigerating.
- Freezing Option: If you want to extend the storage time, consider freezing your pop-tarts. After they have cooled completely, wrap each pastry tightly in plastic wrap, then place them in a freezer-safe bag or container. Label with the date for easy tracking. Frozen pop-tarts can be stored for up to a month or more.
- Toasting from Frozen: When you’re ready to enjoy a frozen pop-tart, there’s no need to thaw. Simply pop them in the toaster straight from the freezer until warmed to your liking. This maintains the pastry’s texture and prevents it from becoming overly soft.
- Avoid Moisture: Moisture is the enemy of pastry crispiness. Whether storing in the refrigerator or freezer, ensure your storage container is airtight to prevent the pop-tarts from absorbing excess moisture.
- Separate with Parchment: If stacking pop-tarts in a container, consider placing a piece of parchment paper between layers to prevent them from sticking together.
- Store Frosting Separately: If you’ve already frosted your pop-tarts, be aware that the frosting may become a bit softer when stored. To maintain its texture, you can store the frosting separately and apply it just before serving.
- Room Temperature (Short Term): If you plan to consume the pop-tarts within a day or two, storing them in an airtight container at room temperature is acceptable. However, keep in mind that they may not stay as fresh for an extended period compared to refrigeration or freezing.
Tips for Perfect Homemade Pop-Tarts:
- Chill the Dough: For flakier and more tender crusts, let the pie crust dough chill in the refrigerator for about 30 minutes before rolling it out.
- Even Thickness: Roll out the pie crust to an even thickness. This ensures that the pop-tarts cook uniformly and have a consistent texture.
- Seal the Edges Well: Use a fork to firmly seal the edges of the pop-tarts. This prevents the filling from leaking during baking and helps maintain a tidy appearance.
- Poking Holes: Don’t skip poking holes in the top crust. This allows steam to escape during baking, preventing the pop-tarts from becoming too puffy and ensuring a crispy texture.
- Egg Wash Shine: Brushing the pop-tarts with an egg wash not only gives them a golden color but also adds a nice shine to the crust.
- Room for Filling: Leave a small border around the edges when spreading the filling. This prevents the filling from oozing out while baking.
- Homemade Frosting Consistency: If making your own frosting, adjust the consistency by adding more powdered sugar for a thicker frosting or a bit of milk for a thinner one.
- Creative Shapes: Use cookie cutters to create fun and unique shapes for your pop-tarts. This adds an extra element of creativity, especially if you’re making them with kids.
Variations to Spice Things Up:
- Fruit Varieties: Experiment with different fruit jams and jellies. Raspberry, blueberry, peach, or a combination of flavors can add exciting twists to your pop-tarts.
- Nutella or Peanut Butter: Spread a thin layer of Nutella or peanut butter along with the fruit filling for a deliciously nutty addition.
- Cinnamon Sugar Coating: Sprinkle the tops with a mixture of cinnamon and sugar before baking for a sweet and slightly spiced crust.
- Drizzle with Chocolate: After frosting, drizzle melted chocolate over the top for a decadent touch. White or dark chocolate both work well.
- Add Nuts or Coconut: Sprinkle chopped nuts or shredded coconut over the frosting for extra texture and flavor.
- Citrus Zest: Add a burst of citrus flavor by incorporating zest from oranges, lemons, or limes into the filling or frosting.
- Savory Pop-Tarts: Try a savory twist by filling the pop-tarts with ingredients like cheese, ham, or even pizza sauce.
- Spice Infusion: Enhance the filling with a pinch of spices like cinnamon, nutmeg, or ginger for a warm and comforting flavor.


