Indulge in a delightful twist to your traditional brownie experience with these scrumptious Brownie Mix Cookies! Combining the rich, fudgy essence of brownies with the convenience of a cookie, this recipe offers a fun and delicious way to savor your favorite chocolate treat.
Cooking time :
To ensure your Brownie Mix Cookies are perfectly baked, I recommend the following:
- Keep an Eye on Them: Begin checking the cookies around the 7-minute mark. They should be set around the edges but still soft in the middle.
- Adjust for Size: If you make larger cookies, they may need a bit more time, while smaller cookies might be ready a bit sooner.
- Use Visual Cues: Look for a slightly cracked appearance on the surface of the cookies. This is a good indicator that they are done.
- Doneness Test: Insert a toothpick into the center of a cookie. If it comes out with a few moist crumbs (not wet batter), the cookies are done.
Ingredients:
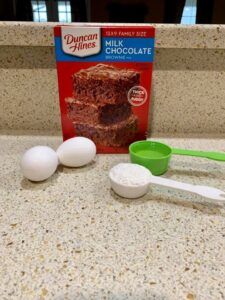
- 1 box Brownie Mix
- 2 Eggs
- 1/4 cup Vegetable Oil
- 1/8 cup All-Purpose Flour
- Optional: Nuts of your choice

Instructions:
- Preheat Oven:
- Preheat your oven to 350°F (175°C).
- Prepare Baking Sheet:
- Line a baking sheet with parchment paper for easy cleanup.
- Mix Ingredients:
- In a large mixing bowl, combine the brownie mix, eggs, vegetable oil, and all-purpose flour. If you like a nutty texture, you can add chopped nuts at this stage.
- Combine Thoroughly:
- Mix the ingredients well until a thick, cookie-like batter is formed. Ensure that all dry ingredients are fully incorporated.
- Scoop onto Baking Sheet:
- Using a spoon or cookie scoop, drop portions of the batter onto the prepared baking sheet. Make sure to leave enough space between each cookie as they will spread while baking.
- Bake:
- Place the baking sheet in the preheated oven and bake for approximately 9 minutes. Keep an eye on them as baking times may vary depending on your oven and the size of your cookies.
- Cooling:
- Once baked, allow the cookies to set on the baking sheet for about 5 minutes. This helps them firm up before transferring to a cooling rack.
- Transfer to Cooling Rack:
- After the initial 5 minutes, carefully transfer the cookies to a cooling rack to cool completely.
- Enjoy:
- Once completely cooled, your brownie mix cookies are ready to be enjoyed! They should have a soft and chewy texture, reminiscent of brownies but in a cookie form.
Why You’ll Love It:
You’ll love these Brownie Mix Cookies for a multitude of reasons that extend beyond their simple preparation. Here’s why they’re bound to become a favorite:
- Effortless Indulgence:
- With just a few basic ingredients and minimal prep time, these cookies offer a quick and hassle-free way to satisfy your chocolate cravings.
- Perfect Harmony of Flavors:
- Combining the best elements of brownies and cookies, these treats boast a rich, fudgy taste with a delightful chewiness that will leave your taste buds in awe.
- Versatile and Customizable:
- The recipe serves as a canvas for creativity. Add your favorite nuts, chocolate chips, or other mix-ins to tailor the cookies to your personal preferences.
- Quick Baking Time:
- In just around 9 minutes, you can have warm, freshly baked cookies ready to enjoy. It’s a speedy solution for those sudden sweet cravings or surprise guests.
- Enjoy Warm or Cool:
- Whether you savor them fresh out of the oven or allow them to cool, these cookies maintain their delightful texture and chocolatey goodness.
- Crowd-Pleasing Treat:
- Perfect for family gatherings, potlucks, or simply as a sweet surprise for your loved ones, these cookies are universally loved and disappear quickly.
- Easy Cleanup:
- The use of parchment paper on the baking sheet not only prevents sticking but also ensures a hassle-free cleanup – leaving you with more time to enjoy your delicious creation.
- A Unique Twist on Tradition:
- Elevate your brownie experience by presenting it in a cookie form. It’s a fun and unique way to enjoy a classic chocolate treat.
- Homemade Comfort:
- Baking these cookies fills your home with the comforting aroma of chocolate. There’s something special about enjoying a homemade treat straight from the oven.
- Shareable Joy:
- These cookies make for wonderful gifts. Share the joy of homemade sweetness with friends, family, or neighbors.
How to store it :
Proper storage is key to maintaining the freshness and flavor of your Brownie Mix Cookies. Here’s how to store them for optimal results:
Short-Term Storage (Up to a Week):
- Cool Completely:
- Allow the cookies to cool completely on the cooling rack after baking.
- Air-Tight Container:
- Transfer the cooled cookies into an airtight container. Make sure the container is clean and dry.
- Layering:
- If stacking the cookies, consider placing a sheet of parchment paper between layers to prevent them from sticking together.
- Room Temperature:
- Store the airtight container at room temperature. The cookies should remain fresh for up to a week.
Long-Term Storage (Beyond a Week):
- Cool Completely:
- Again, ensure the cookies are fully cooled before storing.
- Freeze in a Single Layer:
- Place the cookies in a single layer on a baking sheet and freeze them until solid. This prevents the cookies from sticking together.
- Transfer to Freezer Bag or Container:
- Once frozen, transfer the cookies to a freezer-safe bag or airtight container. If using a bag, try to remove as much air as possible before sealing.
- Label and Date:
- Label the container or bag with the contents and date for easy identification.
- Freeze:
- Store the cookies in the freezer. They can be frozen for up to 2-3 months.
Thawing:
- Room Temperature:
- To thaw cookies, simply remove them from the freezer and let them come to room temperature in the sealed container or bag.
- Reheat (Optional):
- If desired, you can briefly warm the cookies in a preheated oven for a few minutes to regain that freshly baked taste.


