
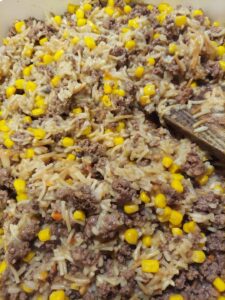
Introducing this hearty and flavorful Beef Rice-A-Roni creation, a simple yet satisfying meal that combines the convenience of a classic pantry staple with the richness of ground beef, creaminess of mushroom soup, and the sweetness of corn. This recipe is a delightful fusion of textures and tastes, perfect for busy evenings when you crave a homemade dish without the fuss. Let’s delve into the step-by-step guide for creating this comforting and versatile meal:
Cooking time:
The cooking time for Beef Rice-A-Roni meal can vary depending on the specific instructions on the Rice-A-Roni box. However, here’s a general guideline based on the typical cooking times for Rice-A-Roni:
- Browning Ground Beef: Approximately 8-10 minutes.
- Cook until the ground beef is browned, and any excess fat is drained.
- Preparing Rice-A-Roni Base: Follow the instructions on the Rice-A-Roni box, typically around 15-20 minutes.
- This involves toasting the rice and vermicelli, adding water, and simmering until the rice is tender.
- Combining Ingredients and Finishing Cooking: Approximately 5-10 minutes.
- After adding the ground beef, corn, and cream of mushroom soup, continue cooking until all ingredients are heated through and well combined.
Keep in mind that actual cooking times may vary, so it’s essential to monitor the dish as it cooks. The goal is to have the rice fully cooked and the flavors melded together. If you choose to add extra ingredients, such as vegetables, ensure they are cooked to your desired level of tenderness.
Ingredients:
- 2 boxes of beef Rice-A-Roni
- 1 lb of ground beef
- 1 can of corn, drained
- 1 can of cream of mushroom soup
Instructions:
1. Brown the Ground Beef:
- In a large skillet over medium-high heat, add the ground beef. Break it apart with a spatula and cook until browned, ensuring it’s fully cooked.
- Once cooked, use a slotted spoon to remove the cooked ground beef from the skillet, leaving behind any excess fat.
2. Prepare the Rice-A-Roni:
- In the same skillet, follow the directions on the beef Rice-A-Roni boxes. This usually involves toasting the rice and vermicelli in the skillet before adding water and the seasoning packets.
- However, use about half a cup less water than indicated on the box. This helps create a thicker consistency for the final dish.
3. Add Ground Beef and Other Ingredients:
- After adding the rice and powder mix to the skillet, immediately stir in the browned ground beef. This allows the flavors of the beef to infuse into the rice during the cooking process.
- Add the drained corn to the skillet. The sweet and crunchy corn will add a nice contrast to the savory beef and rice.
- Spoon in the cream of mushroom soup. This will contribute to the creaminess and richness of the dish.
4. Continue Cooking:
- Continue cooking the entire mixture according to the instructions on the Rice-A-Roni box. Typically, this involves simmering the mixture until the rice is tender and has absorbed the liquid.
- Stir occasionally to ensure even cooking and distribution of flavors. Adjust the heat as needed to maintain a gentle simmer.
5. Variations and Add-On Ideas:
- If you’re adding vegetables like bell peppers or peas, incorporate them at this stage, ensuring they cook along with the rice.
- If you’re opting for a cheese topping, sprinkle shredded cheese over the dish a few minutes before it’s done cooking. Cover the skillet to allow the cheese to melt.
6. Fresh Herbs and Serving:
- Just before serving, stir in fresh herbs like parsley or cilantro. This adds a burst of freshness to the dish.
- Taste and adjust the seasoning if necessary.
7. Presentation:
- Serve the Beef Rice-A-Roni hot and garnish with additional fresh herbs if desired. Consider offering additional toppings like grated Parmesan cheese or a drizzle of hot sauce for individual preferences.
Why You’ll Love It:
You’ll love this Beef Rice-A-Roni creation for several reasons, making it a delightful and satisfying meal option:
- Quick and Easy: This recipe is a testament to convenience without compromising on flavor. With simple ingredients and straightforward steps, it’s an excellent choice for busy evenings when you want a home-cooked meal without extensive preparation.
- Versatile and Customizable: The dish serves as a canvas for creativity. You can personalize it by adding different vegetables, experimenting with cheese toppings, or incorporating various herbs and spices. This adaptability allows you to tailor the meal to your taste preferences.
- Comfort in a Bowl: The combination of ground beef, creamy mushroom soup, and sweet corn creates a comforting and indulgent flavor profile. It’s a hearty and warm dish that brings a sense of comfort to your dining table.
- Budget-Friendly: Utilizing budget-friendly ingredients like ground beef and Rice-A-Roni, this recipe is a cost-effective way to prepare a delicious and substantial meal for your family or guests.
- One-Pan Wonder: With minimal cleanup, this one-pan wonder minimizes the effort spent on post-cooking chores. The use of a single skillet for browning the beef and preparing the Rice-A-Roni streamlines the cooking process.
- Familiar and Nostalgic: The combination of Rice-A-Roni, ground beef, and cream of mushroom soup may evoke feelings of nostalgia for those who appreciate classic, homey flavors. It’s a timeless dish that resonates with comfort and tradition.
- Balanced Flavors and Textures: The blend of savory ground beef, creamy mushroom soup, and sweet corn creates a well-balanced dish with a variety of flavors and textures. Each bite offers a satisfying combination of richness, sweetness, and tenderness.
- Adaptable for Family Meals: This dish is family-friendly and can be easily adapted to suit the tastes of both kids and adults. The familiar ingredients make it a reliable choice for family dinners or gatherings.
How to store it :
Storing Beef Rice-A-Roni dish properly ensures its freshness and flavor for later enjoyment. Here’s a guide on how to store it:
Refrigeration:
- Cooling Down: Allow the Beef Rice-A-Roni to cool to room temperature before storing. This helps prevent condensation and the development of excess moisture in the storage container.
- Airtight Container: Transfer the leftover Beef Rice-A-Roni to an airtight container. This can be a plastic or glass container with a tight-sealing lid.
- Labeling and Dating: Consider labeling the container with the date to help keep track of its freshness. This is especially useful if you plan to keep it in the refrigerator for a few days.
- Refrigeration Time: Store the Beef Rice-A-Roni in the refrigerator for up to 3-4 days. Consume it within this time frame to ensure optimal taste and quality.
Freezing:
- Cooling and Portioning: Allow the dish to cool completely before freezing. Consider portioning it into meal-sized servings for easier thawing and reheating.
- Freezer-Safe Containers or Bags: Use freezer-safe containers or heavy-duty, zip-top freezer bags to store the Beef Rice-A-Roni. Remove as much air as possible from the bags to minimize the risk of freezer burn.
- Labeling: Clearly label the containers or bags with the date of freezing and any reheating instructions. This will help you keep track of storage time and ensure you use it within the recommended time frame.
- Freezer Time: Beef Rice-A-Roni can be stored in the freezer for up to 2-3 months. While it may be safe to freeze for a more extended period, the quality can start to decline over time.
Reheating:
- Refrigerated Leftovers: If refrigerated, reheat the Beef Rice-A-Roni in the microwave or on the stovetop until it reaches your desired temperature. Add a splash of water if needed to prevent it from drying out.
- Frozen Leftovers: Thaw frozen Beef Rice-A-Roni in the refrigerator overnight. Reheat as mentioned above, ensuring it’s thoroughly heated.
Tips for Making Baked Tortellini:
- Quality Ingredients: Use high-quality tortellini, fresh cheeses, and a flavorful pasta sauce to enhance the overall taste of the dish.
- Cook Tortellini Al Dente: When boiling the tortellini, cook it al dente. This ensures that it holds its shape during baking and doesn’t become mushy.
- Seasoning Ground Beef: Season the ground beef with your favorite spices and herbs to add depth of flavor. Common choices include garlic powder, onion powder, Italian seasoning, salt, and pepper.
- Creamy Texture: The addition of cream cheese to the sauce creates a creamy texture. Ensure the cream cheese is fully melted and well incorporated into the sauce for a velvety consistency.
- Cheese Blend: Experiment with different cheese blends. Mix mozzarella with Parmesan, provolone, or fontina for a more complex and rich flavor.
- Fresh Herbs: Add a handful of fresh herbs such as basil or parsley to the dish just before baking for a burst of freshness.
- Preheat the Oven: Make sure to preheat your oven before baking to ensure even cooking and proper melting of the cheese.
- Cover While Baking: If you notice the cheese is browning too quickly, cover the baking dish loosely with aluminum foil during part of the baking time to prevent excessive browning.
Variations for Baked Tortellini:
- Vegetarian Option: Skip the ground beef and create a vegetarian version by adding sautéed vegetables like spinach, mushrooms, and bell peppers.
- Sausage Twist: Replace ground beef with Italian sausage for a flavorful twist. Make sure to cook and crumble the sausage before adding it to the sauce.
- Three-Cheese Baked Tortellini: Use a blend of three cheeses like mozzarella, Parmesan, and ricotta or cream cheese for an extra cheesy experience.
- Pesto Infusion: Mix in a few spoonfuls of pesto sauce to add a vibrant basil flavor to the dish.
- Spicy Kick: For those who enjoy heat, add red pepper flakes or diced jalapeños to the ground beef mixture.
- Sun-Dried Tomatoes: Incorporate chopped sun-dried tomatoes for a sweet and tangy element.
- Mushroom Lovers: Sauté sliced mushrooms and add them to the ground beef mixture for a delicious earthy flavor.
-
Bread Crumb Topping: Sprinkle a layer of seasoned breadcrumbs on top of the cheese before baking to add a crunchy texture.


