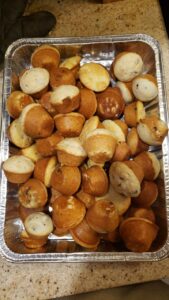
Are you tired of spending a fortune on store-bought muffin packs for your kids? I’ve got the perfect solution for you – a homemade mini muffin extravaganza that’s not only delicious but also incredibly budget-friendly. Inspired by the desire to provide my children with a variety of tasty treats without breaking the bank, I’ve crafted a versatile muffin recipe that yields four mouthwatering flavors: chocolate chip, blueberry, birthday cake, and strawberry cheesecake.
In this culinary adventure, you’ll not only save money but also engage your kids in the creative process of baking. Join me in the kitchen as we explore the art of crafting these delightful mini muffins that are sure to become a household favorite. Let’s dive into the details of this easy-to-follow recipe, where simplicity meets scrumptiousness, and your little ones’ taste buds are in for a treat!
Ingredients:
- 2 cups all-purpose flour
- 1 cup granulated sugar
- 1 tablespoon baking powder
- 1/2 teaspoon salt
- 2 large eggs
- 1 cup milk
- 1/2 cup vegetable oil
- 1 teaspoon vanilla extract
Flavor Variations:
- Chocolate Chip Muffins:
- 1 cup chocolate chips
- Blueberry Muffins:
- 1 cup fresh or frozen blueberries (if using frozen, do not thaw)
- Birthday Cake Muffins:
- 1/2 cup rainbow sprinkles
- 1/2 teaspoon almond extract (for a birthday cake flavor)
- Strawberry Cheesecake Muffins:
- 1 cup diced fresh strawberries
- 1/2 cup cream cheese, softened
Instructions:
- Preheat Oven: Preheat your oven to 375°F (190°C). Grease or line a mini muffin pan.
- Prepare Batter: In a large bowl, whisk together the flour, sugar, baking powder, and salt.
- Wet Ingredients: In another bowl, beat the eggs, then add the milk, vegetable oil, and vanilla extract. Mix well.
- Combine Wet and Dry Ingredients: Pour the wet ingredients into the dry ingredients and stir until just combined. Do not overmix; it’s okay if there are a few lumps.
- Divide Batter: Divide the batter equally into four separate bowls.
- Flavor Each Batch:
- For Chocolate Chip Muffins, fold in the chocolate chips into one bowl of batter.
- For Blueberry Muffins, gently fold in the blueberries into another bowl of batter.
- For Birthday Cake Muffins, fold in the rainbow sprinkles and almond extract into the third bowl of batter.
- For Strawberry Cheesecake Muffins, fold in the diced strawberries and softened cream cheese into the fourth bowl of batter.
- Fill Muffin Cups: Spoon each flavored batter into the mini muffin cups, filling each about two-thirds full.
- Bake: Bake for 10-12 minutes or until a toothpick inserted into the center comes out clean.
- Cool: Allow the muffins to cool in the pan for a few minutes before transferring them to a wire rack to cool completely.
Why You’ll Love It:
- Cost-Effective Delight: Say goodbye to pricey store-bought muffin packs! This homemade mini muffin extravaganza allows you to treat your kids to a delightful variety of flavors without breaking the bank. For just $5, you’ll have a total of 36 muffins – a pocket-friendly solution for families looking to save on snacks.
- Versatile Flavors: Variety is the spice of life, and these mini muffins deliver just that. From classic chocolate chip to the fruity burst of blueberry, the festive fun of birthday cake, and the lusciousness of strawberry cheesecake, each flavor is a mini adventure in itself. Customize the selection based on your family’s preferences, and watch as these tiny treats become a weekly highlight.
- Easy-to-Follow Recipe: No need to be a master chef – this recipe is designed for simplicity without compromising on taste. With clear instructions and common pantry ingredients, you’ll find joy in the process of creating these mini marvels. It’s a perfect opportunity to involve your kids in the kitchen, making baking a delightful family activity.
- Perfectly Portioned Mini Muffins: The mini muffin size is not only adorable but also ideal for little hands and appetites. These bite-sized delights are perfect for lunchboxes, snack time, or even as a sweet addition to your morning coffee routine.
- Creative Culinary Experience: Unleash your inner chef and embark on a culinary adventure with these homemade mini muffins. Experiment with different flavors, or stick to the tried-and-true classics – the choice is yours. This recipe encourages creativity and offers a canvas for personalization.
- Quality Ingredients, Controlled Process: By making these muffins at home, you have control over the quality of ingredients, ensuring a healthier and more wholesome snack for your family. You can also adjust sweetness levels and experiment with alternative ingredients to suit dietary preferences.
How to store it:
Storing homemade mini muffins properly is crucial to maintain their freshness and flavor. Here are some tips on how to store them:
- Room Temperature:
- If you plan to consume the mini muffins within 1-2 days, storing them at room temperature in an airtight container or a resealable plastic bag is acceptable.
- Ensure the container is sealed tightly to prevent moisture from affecting the texture of the muffins.
- Refrigeration:
- For longer storage, you can refrigerate the mini muffins. Place them in an airtight container or wrap them in plastic wrap before refrigerating.
- Refrigeration helps extend the shelf life to around 5-7 days. However, keep in mind that refrigeration may lead to the muffins drying out faster, so proper sealing is essential.
- Freezing:
- If you want to store the mini muffins for an extended period, consider freezing them.
- Place the muffins in a single layer on a baking sheet and freeze until solid. Once frozen, transfer them to a sealed container or a zip-top freezer bag.
- Label the container with the date for easy tracking.
- Mini muffins can be stored in the freezer for up to 2-3 months.
- Thawing:
- When ready to enjoy the frozen mini muffins, take them out of the freezer and let them thaw at room temperature for a few hours or overnight.
- For a quick thaw, you can use a microwave at a low setting, but be cautious not to overheat and dry out the muffins.
- Avoid Moisture:
- Regardless of the storage method, make sure the muffins are completely cooled before sealing them. Moisture can lead to sogginess and affect the texture of the muffins.
-
Separation:
- If storing different flavored muffins together, consider placing a sheet of parchment paper between layers to prevent flavors from mingling.

