
If you love Reese’s Peanut Butter Cups, you’re going to adore these homemade peanut butter bars! They taste just like the real thing and are incredibly easy to make. With a rich peanut butter base and a smooth chocolate topping, these bars are perfect for satisfying your sweet tooth. Here’s how to make them.
Ingredients
- 1/2 cup of melted butter: Adds richness and helps bind the base together.
- 1 cup of crushed graham crackers (a whole sleeve): Provides a crunchy texture and complements the peanut butter flavor.
- 2 cups of powdered sugar: Sweetens the base and gives it a smooth texture.
- 1 cup of peanut butter (for the bottom layer): The star ingredient that gives the bars their signature taste.
- 2 tablespoons of peanut butter (for the chocolate topping): Enhances the chocolate topping and ensures a smooth texture.
- 1 cup of chocolate chips: Creates the delicious chocolate layer on top.
Instructions
- Prepare the Peanut Butter Base:
- In a large mixing bowl, combine the crushed graham crackers, melted butter, and powdered sugar. Mix well until all the ingredients are fully combined.
- Add in the 1 cup of peanut butter and continue to mix until the mixture is smooth and well blended.
- Press the peanut butter mixture evenly into the bottom of a 9×13-inch pan. Use a spatula or the back of a spoon to smooth the surface.
- Make the Chocolate Topping:
- In a microwave-safe bowl, combine the chocolate chips and 2 tablespoons of peanut butter.
- Microwave in 30-second intervals, stirring between each interval, until the chocolate and peanut butter are completely melted and smooth.
- Assemble the Bars:
- Pour the melted chocolate mixture over the peanut butter base, spreading it evenly to cover the entire surface.
- Gently tap the pan on the counter to remove any air bubbles and ensure the chocolate topping is smooth.
- Chill:
- Place the pan in the refrigerator and chill for at least 2 hours, or until the bars are firm and set.
- Serve:
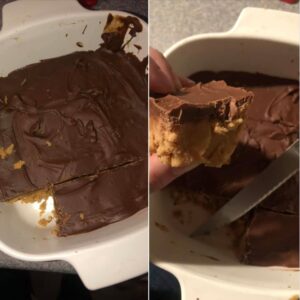
- Once chilled, remove the pan from the refrigerator. Cut into squares or bars using a sharp knife.
- Enjoy your homemade Reese’s Peanut Butter Bars!
Why You’ll Love These Bars
- Quick and Easy: With simple ingredients and no baking required, these bars are a breeze to make.
- Rich and Decadent: The combination of peanut butter and chocolate creates a rich and satisfying treat.
- No-Bake Dessert: Perfect for warm days when you don’t want to turn on the oven.
- Great for Sharing: These bars are perfect for parties, potlucks, or as a homemade gift.
- Customizable: You can easily adjust the recipe to suit your taste or dietary preferences.
- Kid-Friendly: Easy to make with kids and a hit with the whole family.
- Perfect Texture: The crunchy graham cracker base and smooth chocolate topping provide a delightful contrast.
- Irresistible Flavor: Tastes just like your favorite Reese’s peanut butter cups.
- Make-Ahead: Can be prepared in advance and stored in the fridge for a ready-to-eat treat.
- Portable: Easy to transport, making them great for lunchboxes or picnics.
Tips for Making the Perfect Peanut Butter Bars
- Use High-Quality Ingredients: High-quality peanut butter and chocolate chips will enhance the flavor of your bars.
- Smooth Peanut Butter: Use smooth peanut butter for the best texture. If you prefer a crunch, you can use crunchy peanut butter.
- Even Layering: Ensure the peanut butter base is pressed firmly and evenly into the pan for a uniform layer.
- Melting Chocolate: Be careful when melting the chocolate to avoid burning it. Stir frequently and use short microwave intervals.
- Chilling Time: Allow enough time for the bars to chill and set properly. This ensures they hold their shape when cut.
How to Store Peanut Butter Bars
Store the peanut butter bars in an airtight container in the refrigerator. They will keep well for up to one week. For longer storage, you can freeze the bars for up to three months. Simply place them in a freezer-safe container with parchment paper between the layers to prevent sticking. Thaw in the refrigerator before serving.


