
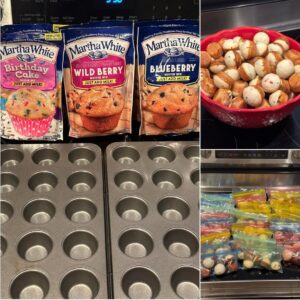
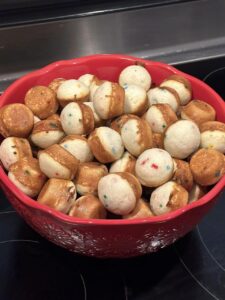
Embark on a delightful culinary journey with our Martha White Mini Muffins – a quick, easy, and utterly delicious homemade treat that promises to satisfy your cravings and elevate your breakfast or snack game. In just a few simple steps, you’ll create a mini muffin extravaganza featuring three irresistible flavors: Blueberry, Wild Berry, and Birthday Cake.
Cooking time:
The cooking time for Martha White mini muffins is generally shorter than standard-sized muffins due to their smaller size. Here are some general guidelines:
- Preheat Oven:
- Preheat your oven according to the package directions, typically around 400°F (200°C).
- Mix Preparation:
- Follow the package directions for each flavor of mini muffin mix, combining the mix with water.
- Baking Time:
- Since you’re using mini muffin tins, the baking time is significantly shorter. Typically, bake for 5 to 7 minutes, or as specified on the package. Check for doneness by inserting a toothpick into the center of a muffin; it should come out clean or with a few moist crumbs.
- Cooling:
- Allow the mini muffins to cool in the tin for a few minutes before transferring them to a wire rack to cool completely.
Keep a close eye on the mini muffins while baking to prevent overcooking. The smaller size means they cook faster, and you want to ensure they stay moist and tender.
Ingredients:
- 6 packages of Martha White mini muffin mixes (2 blueberry, 2 wild berry, 2 birthday cake)
- Water (as per package directions)
- Mini muffin tins
Instructions:
- Preheat the Oven:
- Preheat your oven according to the package directions on the Martha White mini muffin mixes.
- Prepare the Muffin Mix:
- Follow the package directions for each flavor of mini muffin mix. Typically, you’ll need to combine the mix with water. Be sure to use the recommended measurements.
- Prep Mini Muffin Tins:
- Grease or line your mini muffin tins to ensure easy removal of the mini muffins after baking.
- Baking Time:
- Since you’re using mini muffin tins, reduce the baking time to 5-7 minutes or as specified on the package. Keep a close eye on them to avoid overbaking. Mini muffins bake faster than regular-sized ones.
- Cooling:
- Allow the mini muffins to cool in the tin for a few minutes before transferring them to a wire rack to cool completely.
- Storage:
- Once cooled, you can choose to enjoy them immediately or prepare them for storage. Your yield of 32 baggies (5 muffins in each) is a convenient way to portion and store.
- Portioning and Storage:
- Divide the mini muffins into individual baggies, placing about 5 muffins in each bag. This makes them easy to grab for a quick breakfast or snack.
- Refrigeration and Freezing:
- These mini muffins can be refrigerated or frozen for longer shelf life. If freezing, ensure they are in airtight bags to prevent freezer burn. They can be taken out to thaw overnight in the refrigerator.
- On-the-Go Breakfast or Snack:
- These mini muffins are perfect for busy mornings or on-the-go snacks. Grab a baggie, and you’re ready to roll!
- Kid-Friendly Fun:
- Involve the kids in the kitchen! Let them help with measuring ingredients, stirring the batter, or placing mini muffin liners in the tins. It’s a fun and delicious activity for the whole family.
Tips:
- Experiment with adding fresh berries or sprinkles to the birthday cake mix for extra flavor and fun.
- Consider making a variety of flavors in each batch for a diverse assortment of mini muffins.

Why You’ll Love It:
- Variety Pack Extravaganza: With flavors like Blueberry, Wild Berry, and Birthday Cake, you’re in for a mini muffin adventure. Six packages allow you to savor a variety of tastes in one baking session.
- Kid-Friendly Fun: Get the whole family involved! These mini muffins are not only delicious but also a perfect opportunity for kids to lend a hand in the kitchen. Let them mix, pour, and enjoy the process of creating these delightful treats.
- Quick and Convenient: Prepare the mini muffins according to package directions and enjoy the convenience of a speedy bake. In just 5-7 minutes, you’ll have a batch of fresh, warm mini muffins ready to be devoured.
- Budget-Friendly: Making your mini muffins is not only delicious but also budget-friendly. Skip the prepackaged versions and relish the homemade goodness that won’t break the bank.
- Perfect for On-the-Go: Portion these mini delights into individual baggies (32 in total, 5 muffins per bag) for the ultimate on-the-go breakfast or snack. Ideal for busy mornings or whenever you need a quick pick-me-up.
- Versatile Storage: Refrigerate or freeze these mini muffins for extended freshness. Take them out to thaw overnight for a ready-to-eat treat whenever the craving strikes.
- Customization Options: Feel free to get creative! Add fresh berries or sprinkles to the birthday cake mix for an extra burst of flavor and visual appeal.
- Homemade Love: Nothing beats the warmth and love that comes with homemade goodies. Share these Martha White Mini Muffins with family, friends, or keep them all to yourself – either way, it’s a delightful experience.
How to store it :
Storing Martha White mini muffins properly is crucial to maintaining their freshness and flavor. Here’s how you can store them:
- Room Temperature:
- If you plan to consume the mini muffins within a day or two, you can store them at room temperature. Place them in an airtight container or sealable plastic bag to prevent them from drying out.
- Refrigeration:
- For longer storage, especially if you’ve made a larger batch, consider refrigerating the mini muffins. Place them in an airtight container or wrap them tightly with plastic wrap to retain moisture.
- Freezing:
- Mini muffins freeze well and can be stored for an extended period. Here’s how to freeze them:
- Allow the mini muffins to cool completely.
- Place them in a single layer on a baking sheet and freeze for a couple of hours. This prevents them from sticking together.
- Once frozen, transfer the mini muffins to a freezer-safe bag or container. Label with the date for reference.
- To thaw, you can leave them at room temperature or heat them briefly in the microwave.
- Mini muffins freeze well and can be stored for an extended period. Here’s how to freeze them:
- Individual Bagging:
- If you’ve portioned the mini muffins into individual baggies (as mentioned in your previous messages), you can use these baggies for storage. Ensure they are sealed tightly to keep the muffins fresh.
- Avoid Moisture:
- Whether at room temperature, in the refrigerator, or the freezer, it’s essential to keep the mini muffins away from moisture. Moisture can lead to a loss of freshness and affect the texture.
- Quality Check:
- Before serving, check the stored mini muffins for any signs of freezer burn or staleness. If they’ve been stored properly, they should retain their quality.
Tips for Making Martha White Mini Muffins:
- Check Doneness Early: Mini muffins bake quickly, so start checking for doneness a minute or two before the minimum recommended baking time. Insert a toothpick into the center of a muffin; if it comes out clean or with a few moist crumbs, they are ready.
- Use Fresh Ingredients: For the best flavor and texture, use fresh and high-quality ingredients, including fresh eggs, water, and any mix-ins like berries or chocolate chips.
- Customize Toppings: Before baking, consider adding a sprinkle of sugar or a few extra berries on top of each mini muffin for a delightful visual appeal.
- Experiment with Mix-Ins: Enhance the flavor and texture by adding your favorite mix-ins. Chocolate chips, nuts, or dried fruit can add extra layers of taste and texture to the mini muffins.
- Avoid Overmixing: Overmixing the batter can result in dense and tough muffins. Mix until the ingredients are just combined to achieve a light and tender texture.
- Preheat the Oven: Ensure your oven is fully preheated before placing the mini muffins inside. This helps them rise properly and ensures even baking.
- Fill Muffin Cups Properly: Fill each mini muffin cup about two-thirds full to allow for proper rising during baking.
- Cooling Technique: Allow the mini muffins to cool in the tin for a few minutes before transferring them to a wire rack. This helps prevent them from becoming soggy due to trapped steam.
Variations for Martha White Mini Muffins:
- Fruit-Filled Mini Muffins: Add diced fruits like apples, bananas, or peaches to the batter for a burst of natural sweetness and added moisture.
- Nutty Delight: Stir in chopped nuts, such as walnuts or pecans, for a delightful crunch.
- Citrus Zest: Add the zest of lemons, oranges, or limes to the batter for a refreshing citrus flavor.
- Spice It Up: Incorporate warm spices like cinnamon, nutmeg, or pumpkin spice into the batter for a cozy, aromatic twist.
- Cream Cheese Swirl: Drop a small spoonful of sweetened cream cheese into each muffin cup before baking for a creamy surprise in the center.
- Double Chocolate Bliss: Mix in cocoa powder and chocolate chips for a rich, double chocolate experience.
- Savory Mini Muffins: Experiment with savory variations by adding ingredients like cheese, herbs, or diced ham for a savory breakfast or snack option.
- Gluten-Free or Vegan: Adapt the recipe to be gluten-free by using gluten-free flour or vegan by substituting plant-based ingredients for eggs and dairy.
Popular Questions and Answers:
Here are some popular questions and answers related to Martha White Mini Muffins:
- Q: How long do Martha White Mini Muffins stay fresh? A: Martha White Mini Muffins are best enjoyed within the first few days. If stored properly in an airtight container or individually bagged, they can stay fresh for up to a week. For longer storage, freezing is recommended.
- Q: Can I add fresh fruit to Martha White Mini Muffins? A: Absolutely! Adding fresh fruit, such as berries, diced apples, or mashed bananas, can enhance the flavor and moisture of the mini muffins. Fold in the fruits gently to avoid overmixing.
- Q: Can I make Martha White Mini Muffins ahead of time? A: Yes, Martha White Mini Muffins can be made ahead of time. Bake and cool them completely before storing in an airtight container or freezing for longer storage.
- Q: How many mini muffins does one Martha White mix make? A: The yield of mini muffins per Martha White mix varies based on the package instructions and the size of the mini muffin tin. Typically, it makes around 12-24 mini muffins.
- Q: Can I use regular-sized muffin tins for Martha White Mini Muffins? A: While Martha White Mini Muffins are specifically designed for mini muffin tins, you can use regular-sized muffin tins and adjust the baking time accordingly. Keep an eye on them and use a toothpick to check for doneness.
- Q: Can I freeze Martha White Mini Muffins? A: Yes, Martha White Mini Muffins freeze well. Allow them to cool completely, then place them in a freezer-safe container or bag. Thaw at room temperature or warm them in the microwave when ready to eat.
- Q: Can I use different liquids instead of water in the mix? A: Yes, you can experiment with using different liquids, such as milk or buttermilk, instead of water in the mix. This can add richness and flavor to the mini muffins.
- Q: How can I prevent mini muffins from sticking to the pan? A: To prevent mini muffins from sticking, ensure that the mini muffin tin is properly greased or lined with paper liners. Additionally, allow the mini muffins to cool slightly before removing them from the tin.
- Q: Can I make Martha White Mini Muffins gluten-free? A: Yes, you can make Martha White Mini Muffins gluten-free by using a gluten-free flour substitute. Be sure to check the package instructions for any additional adjustments needed.
-
Q: Are there savory variations of Martha White Mini Muffins? A: Absolutely! Experiment with savory variations by adding ingredients like cheese, herbs, or diced ham to create delicious savory mini muffins.


