
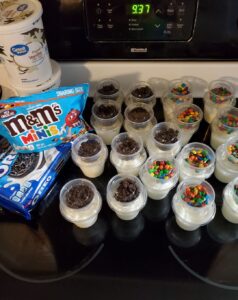
If you’re a parent looking for an affordable and customizable snack for your kids, making your own YoCrunch-style yogurt cups is a great solution. With five kids of my own, I understand how quickly store-bought snacks can add up. That’s why I decided to make these fun and tasty yogurt cups at home. Not only are they easy to prepare, but they also allow you to control the ingredients and cater to your kids’ tastes.
These homemade YoCrunch cups are perfect for lunch boxes, after-school snacks, or a quick breakfast on the go. With just a few simple ingredients and 15 minutes of your time, you can create 20 delicious yogurt cups that your kids will love. Plus, you’ll have plenty of leftover toppings to make another batch next week!
Ingredients:
- 2 tubs of Vanilla yogurt
- Opt for a brand and flavor your kids enjoy. Each tub typically contains about 32 ounces (4 cups) of yogurt.
- 1 pack of M&M minis (shareable size)
- You will use approximately half of this pack for 20 cups.
- 1 pack of Oreos
- About 8 Oreos are needed for this recipe.
- Plastic cups
- Ensure you have 20 small cups on hand. Reusable or disposable cups work well.
Equipment:
- Measuring cups or a kitchen scale for even distribution of yogurt.
- Ziplock bag and rolling pin (or a food processor) for crushing the Oreos.
- Spoons for mixing and serving.
Instructions:
- Prepare the Yogurt:
- Open the tubs of vanilla yogurt.
- Using a measuring cup or kitchen scale, divide the yogurt evenly into 20 plastic cups. Each cup should get about 3.2 ounces (slightly less than half a cup) of yogurt.
- Prepare the Toppings:
- M&M Minis: Set aside a portion of the M&M minis. You will use roughly half of the shareable pack. Distribute a small handful (about 1 teaspoon) of M&M minis into each cup.
- Oreos: Place 8 Oreos in a Ziplock bag. Using a rolling pin, crush the Oreos into small pieces. Alternatively, pulse them in a food processor until they reach your desired consistency.
- Assemble the YoCrunch Cups:
- Sprinkle the crushed Oreos evenly over the yogurt in each cup.
- Add a few M&M minis on top of the crushed Oreos. This will add a nice burst of color and extra crunch.
- Storage:
- Cover each cup with a lid or plastic wrap to keep them fresh.
- Store the assembled cups in the refrigerator until ready to pack in lunch boxes or serve as snacks.
Tips:
- Flavor Variations: Experiment with different yogurt flavors or toppings like granola, fruit, or other candies to keep things interesting.
- Healthy Options: Consider using Greek yogurt for added protein or substituting the M&Ms with fresh fruit for a healthier option.
- Batch Preparation: Prepare a larger batch by scaling up the ingredients if you have more cups and need snacks for the whole week.
- Engage the Kids: Involve your kids in the preparation process. They can help distribute toppings, making it a fun activity.
Why You’ll Love It:
- Cost-Effective: Making your own YoCrunch-style yogurt cups is budget-friendly, especially when you have a large family like mine. By DIY-ing these snacks, you’ll save money compared to buying pre-made options from the store.
- Customizable: One of the best things about making your own YoCrunch cups is the ability to customize them according to your kids’ preferences. From choosing their favorite yogurt flavor to selecting toppings like M&M minis and Oreos, you can tailor each cup to suit their tastes.
- Healthier Option: When you make these yogurt cups at home, you have full control over the ingredients. You can opt for low-fat or Greek yogurt for added protein and choose healthier toppings like fresh fruit or granola. It’s a nutritious snack that you can feel good about serving to your kids.
- Fun and Creative: Involving your kids in the preparation process can turn making YoCrunch cups into a fun and creative activity. They’ll enjoy sprinkling toppings and creating their own flavor combinations, making snack time more enjoyable for everyone.
- Convenient and Quick: Despite being homemade, these yogurt cups are incredibly convenient, making them perfect for busy mornings or hectic school days. With just a few minutes of prep time, you’ll have 20 delicious snacks ready to go in no time.
- Plenty to Share: With 20 cups in one batch, you’ll have plenty of snacks to go around. Whether you’re packing them in lunch boxes or serving them as an after-school treat, there’s enough for everyone to enjoy.
- Versatile Snack: These DIY YoCrunch cups aren’t just for kids – they’re great for adults too! Whether you need a quick pick-me-up at work or a satisfying post-workout snack, these yogurt cups are a versatile option for the whole family.
How to store it :
Once you’ve assembled your homemade YoCrunch-style yogurt cups, it’s essential to store them properly to maintain freshness and flavor. Here’s how to do it:
- Cover and Seal: After assembling the yogurt cups with toppings, cover each cup tightly with a lid or plastic wrap. Ensure that the lids are secure to prevent any air from getting in, which could cause the yogurt to spoil more quickly.
- Refrigerate Immediately: Place the covered yogurt cups in the refrigerator as soon as possible. The cold temperature of the fridge helps to slow down bacterial growth and preserve the freshness of the yogurt and toppings.
- Use within 3-5 Days: Homemade yogurt cups typically stay fresh for about 3 to 5 days when stored properly in the refrigerator. While they may still be safe to eat after this time, the quality and taste may begin to deteriorate.
- Avoid Freezing: It’s best not to freeze your DIY YoCrunch cups, as freezing can change the texture and consistency of the yogurt and toppings. Additionally, the moisture content in the toppings may cause them to become soggy when thawed.
- Keep Away from Strong Odors: Store the yogurt cups away from foods with strong odors in the refrigerator, as yogurt can easily absorb other flavors. Keep them in a designated section or shelf where they won’t be exposed to pungent foods like onions or garlic.
- Stack Carefully: If you need to stack the yogurt cups in the refrigerator to save space, do so carefully to avoid crushing the toppings or causing any leakage. Place them on a stable surface and ensure that they are securely stacked.
-
Check for Signs of Spoilage: Before serving or consuming the yogurt cups, always check for any signs of spoilage, such as an off odor, unusual texture, or mold growth. If you notice any of these signs, discard the yogurt immediately.


