

Introducing these homemade snack wraps! Bursting with flavor and texture, these delightful wraps are a perfect fusion of crispy and tender, bringing together seasoned and marinated chicken with a medley of fresh toppings, all enveloped in a warm tortilla. Let’s dive into the simple yet satisfying process of creating these mouthwatering delights.
Cooking time:
The cooking time for the chicken can vary based on the thickness of the tenderloins and the heat of your cooking oil. Generally, you’ll want to cook the chicken until it reaches an internal temperature of 165°F (74°C) to ensure it’s fully cooked and safe to eat. Here’s a rough guide:
- Frying Time: Fry the coated chicken tenderloins in a skillet with hot oil over medium-high heat. Cooking time is typically around 3-4 minutes per side.
- Internal Temperature: Check the internal temperature of the thickest part of the chicken using a meat thermometer. Once it reaches 165°F (74°C), the chicken is cooked through.
Ingredients:
- Chicken breast tenderloins
- Buttermilk
- 3 cups Flour
- 1/2 cup cornstarch
- Garlic powder
- Onion powder
- Paprika
- Salt
- Pepper
- Tortillas
- Shredded lettuce
- Shredded cheese
- Ranch dressing
Instructions:
- Marinate the Chicken:
- In a bowl, mix buttermilk with garlic powder, onion powder, paprika, salt, and pepper. Adjust the seasonings to your taste.
- Place the chicken breast tenderloins in the buttermilk mixture, ensuring they are well-coated.
- Allow the chicken to marinate in the buttermilk mixture for at least 30 minutes or longer for better flavor absorption.
- Prepare the Coating:
- In a separate bowl, combine flour, cornstarch, garlic powder, onion powder, paprika, salt, and pepper. Mix well to create a seasoned flour mixture.
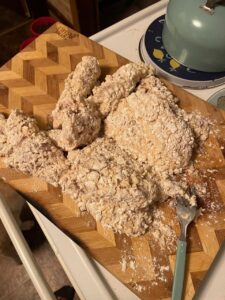
- Coat the Chicken:
- Take each marinated chicken tenderloin and dip it into the seasoned flour/cornstarch mixture, ensuring an even coating.
- Shake off excess flour and dip the chicken back into the buttermilk mixture.
- Repeat the process by dipping the chicken back into the seasoned flour mixture for a second coating.
- Place the coated chicken on a plate and let it sit for 10-15 minutes to allow the coating to set.
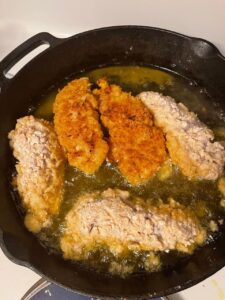
- Cook the Chicken:
- Heat oil in a skillet over medium-high heat.
- Fry the coated chicken tenderloins until golden brown and cooked through, usually 3-4 minutes per side. The internal temperature should reach 165°F (74°C).
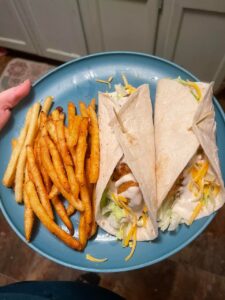
- Assemble the Wraps:
- Warm the tortillas in a dry skillet or microwave.
- Place a tortilla on a flat surface and add a layer of shredded lettuce.
- Put a cooked chicken tenderloin on top of the lettuce.
- Sprinkle shredded cheese over the chicken.
- Drizzle ranch dressing over the top.
- Serve and Enjoy:
- Roll the tortilla tightly to form a wrap.
- Repeat the process for the remaining ingredients.
- Serve the homemade snack wraps immediately, and enjoy your delicious creation!
Why You’ll Love It:
- Flavor Explosion: These homemade snack wraps deliver an explosion of flavors, from the perfectly seasoned and crispy chicken to the fresh crunch of lettuce, the creaminess of melted cheese, and the zing of ranch dressing.
- Customizable Goodness: Tailor these wraps to your taste preferences by adjusting the seasoning levels, choosing your favorite cheese, or experimenting with different types of tortillas.
- Easy Preparation: With a straightforward and easy-to-follow process, these wraps are a breeze to prepare, making them an ideal choice for busy weeknights or casual gatherings.
- Handheld Satisfaction: Enjoy the convenience of a handheld meal that combines all the elements of a satisfying snack or light meal, perfect for on-the-go or casual dining.
- Crowd-Pleasing: Whether you’re hosting a gathering or simply treating yourself, these snack wraps are sure to be a hit with family and friends. The combination of textures and flavors appeals to a wide range of tastes.
- Restaurant-Quality at Home: Experience the joy of creating restaurant-quality wraps in the comfort of your own kitchen. Impress your guests with a dish that looks and tastes like it came straight from a professional kitchen.
- Versatile Anytime Snack: Ideal as a quick snack, a delightful lunch, or a shareable appetizer, these wraps are versatile enough to satisfy your cravings at any time of the day.
- Crunchy and Tender Harmony: Achieve the perfect balance between the crispy exterior of the seasoned chicken and the tender, succulent inside, providing a satisfying contrast in every bite.
- Kid-Friendly Fun: Engage the whole family in the kitchen by allowing everyone to customize their wraps with their favorite toppings. It’s a fun and interactive way to enjoy a meal together.
- Savor the Homemade Touch: There’s something special about savoring a meal made from scratch. These wraps offer the joy of crafting a delicious dish with your own hands, adding that extra touch of love to every bite.

How to store it:
To store the homemade snack wraps and maintain their freshness, follow these guidelines:
- Refrigeration:
- If you have leftover assembled wraps, it’s best to refrigerate them promptly. Place the wraps in an airtight container or wrap them tightly in plastic wrap.
- Separate Components:
- If possible, store the components separately. Keep the cooked chicken in one container, the tortillas in another, and the toppings (lettuce, cheese, and dressing) in separate containers or bags.
- Chicken Storage:
- Store the cooked chicken in the refrigerator for up to 3-4 days. Ensure it’s in a sealed container to prevent drying out or absorbing odors from the fridge.
- Tortilla Storage:
- Tortillas can be stored in their original packaging or transferred to a resealable plastic bag. If you’ve warmed them before assembly, let them cool to room temperature before storing.
- Toppings Storage:
- Keep shredded lettuce, cheese, and any sauces or dressings in separate containers. This helps maintain their individual textures and prevents sogginess.
- Assemble When Ready to Eat:
- If possible, assemble the wraps just before serving. This prevents the tortillas from becoming soggy due to moisture from the toppings.
- Freezing (for Chicken):
- If you want to extend the storage time, consider freezing the cooked chicken. Place the cooled chicken in a freezer-safe container or wrap it tightly in plastic wrap and aluminum foil. Label with the date.
- Reheating:
- When ready to enjoy, reheat the chicken in the oven or a skillet until it reaches the desired temperature. Assemble the wraps with fresh toppings just before serving.
Popular Questions and Answers:
Here are some potential popular questions and their corresponding answers related to the homemade snack wraps:
- Q: Can I use a different type of meat for these wraps? A: Absolutely! Feel free to substitute chicken with other meats like beef, shrimp, or even plant-based alternatives for a different flavor profile.
- Q: Can I make the chicken ahead of time and reheat it? A: Yes, you can prepare the chicken in advance and reheat it when ready to assemble the wraps. Just ensure proper storage in the refrigerator or freezer and reheat to the recommended internal temperature.
- Q: Are there alternatives to buttermilk for marinating the chicken? A: Yes, you can use alternatives like yogurt or a mixture of milk and lemon juice or vinegar to achieve a similar marinating effect.
- Q: Can I make these wraps in advance for a party? A: While you can prepare some components in advance, it’s recommended to assemble the wraps just before serving to maintain the freshness and texture, especially to prevent the tortillas from becoming soggy.
- Q: How can I make these wraps spicier? A: Add cayenne pepper, hot sauce, or chili powder to the seasoning mix for a spicier kick. You can also include sliced jalapeños or a spicy dressing for extra heat.
- Q: Are there healthier alternatives for the coating? A: Consider using whole wheat flour or almond flour for a healthier coating. Baking the coated chicken instead of frying is also a healthier option.
- Q: Can I make these wraps gluten-free? A: Yes, you can use gluten-free flour and cornstarch for the coating, and opt for gluten-free tortillas to make the wraps gluten-free.
- Q: What other toppings can I add to these wraps? A: Get creative! Add diced tomatoes, avocado slices, red onions, or any of your favorite fresh veggies for additional flavor and texture.
-
Q: How long will the assembled wraps stay fresh in the refrigerator? A: Assembled wraps are best enjoyed immediately, but if stored properly in an airtight container, they can be refrigerated for a day. Keep in mind that the tortillas may become slightly softer over time.


