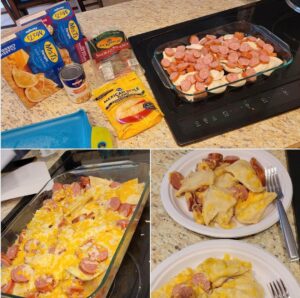
Introducing a delightful twist on comfort food: the Pierogie & Kielbasa Casserole! This hearty dish combines the savory flavors of smoked kielbasa and cheesy pierogies with a hint of garlic salt, all baked to perfection and topped with a generous layer of melted cheese. Whether you’re looking to warm up on a chilly evening or need a satisfying dish for a family gathering, this casserole promises to deliver both comfort and flavor. It’s easy to prepare, customizable with your favorite cheeses or additional veggies like green beans, and perfect for those who love a touch of Eastern European flair in their meals. Serve it up hot, and watch it become the new favorite at your dining table!
Ingredients :
- Pierogies: Choose a flavor that pairs well with kielbasa; potato and cheese or potato and onion are popular choices.
- Smoked Kielbasa: Consider the level of smokiness and spice in the kielbasa. You might also experiment with turkey kielbasa for a lighter option.
- Cheese: Cheddar is suggested, but a blend of cheddar and mozzarella can add a nice stretchiness, while a smoked gouda could enhance the smoky flavor of the kielbasa.
- Green Beans: Fresh green beans can also be used instead of canned for a crisper texture. Just blanch them briefly before adding to the casserole.
Preparation and Baking Enhancements:
- Pre-Baking Pierogies and Kielbasa:
- Optionally, before baking, sauté the kielbasa in a skillet until slightly browned. This step adds a deeper flavor and texture to the sausage.
- Similarly, sautéing pierogies in a bit of butter until lightly golden on each side before baking can add a delightful crispness to their exterior.
- Layering Tips:
- When layering the pierogies and kielbasa in the baking dish, consider adding a sprinkle of finely chopped onions or a layer of sauerkraut between them for additional flavor depth.
- Seasoning Adjustments:
- Along with garlic salt, consider adding paprika or a pinch of cayenne pepper for a subtle heat. A teaspoon of dried thyme or marjoram also complements the flavors well.
- Cheese Layering:
- For even more cheesy goodness, add a thin layer of cheese between the pierogies and kielbasa as well as on top at the end of baking.
- Broth Use:
- If you prefer a creamier texture, mix half of the chicken broth with a few tablespoons of sour cream or cream cheese. Pour this mixture over the pierogies and kielbasa before baking.
- Baking Uncovered:
- If you prefer a crisper top, bake the casserole uncovered for the full duration. Monitor closely to prevent excessive drying or browning.
- Post-Baking:
- After baking, let the casserole sit covered for about 5 minutes. This allows the steam to redistribute throughout the dish, making the pierogies even more tender.
- Serving Suggestions:
- Serve with a dollop of sour cream on the side and a sprinkle of fresh dill or chives to enhance the Eastern European flavors. A side of pickled vegetables, like beets or cucumbers, can add a refreshing contrast to the rich flavors.
Why You’ll Love Pierogie & Kielbasa Casserole recipe :
You’ll love the Pierogie & Kielbasa Casserole for its irresistible combination of flavors and textures. Here’s why:
- Satisfying Comfort: This casserole brings together two classic comfort foods – pierogies and kielbasa – creating a dish that’s hearty, warming, and oh-so-satisfying.
- Easy Preparation: With just a few simple ingredients and straightforward steps, this recipe is easy to make, perfect for busy weeknights or lazy weekends.
- Customizable: You can easily customize this casserole to suit your taste preferences. Experiment with different types of pierogies, kielbasa, cheeses, and seasonings to create your own unique twist on this dish.
- Budget-Friendly: Made with affordable ingredients like pierogies, kielbasa, and cheese, this casserole is budget-friendly and great for feeding a crowd without breaking the bank.
- Versatile: Whether you’re cooking for a family dinner, potluck, or holiday gathering, this casserole is sure to be a hit. Plus, leftovers (if there are any!) can be easily reheated for a quick and delicious meal the next day.
- Deliciously Cheesy: Who can resist the allure of melted cheese? The layer of shredded cheese on top of this casserole adds a gooey, cheesy goodness that takes it to the next level of deliciousness.
- Perfect for Any Occasion: Whether you’re hosting a casual dinner with friends or celebrating a special occasion, this Pierogie & Kielbasa Casserole is a crowd-pleaser that’s sure to impress.
How to store Pierogie & Kielbasa Casserole recipe :
To store the Pierogie & Kielbasa Casserole properly, follow these steps:
- Cooling: Allow the casserole to cool to room temperature before storing. This prevents condensation from forming inside the storage container, which could lead to sogginess.
- Divide into Portions: If you anticipate having leftovers, consider dividing the casserole into smaller portions. This makes it easier to reheat only what you need, reducing waste.
- Storage Container: Transfer the cooled casserole to an airtight storage container. Alternatively, you can cover the baking dish with plastic wrap or aluminum foil.
- Refrigeration: Place the storage container in the refrigerator promptly. The casserole can be stored in the refrigerator for up to 3-4 days.
- Freezing (Optional): If you want to store the casserole for longer periods, you can freeze it. Wrap the individual portions tightly in plastic wrap, aluminum foil, or freezer-safe containers. Properly wrapped, the casserole can be stored in the freezer for up to 1-2 months.
- Thawing and Reheating: When ready to enjoy the stored casserole, thaw it overnight in the refrigerator if frozen. Reheat individual portions in the microwave or oven until heated through. For the oven, cover the dish with foil to prevent drying out, and bake at a low temperature until warmed.
-
Enjoy: Once reheated, serve and enjoy your delicious Pierogie & Kielbasa Casserole!

