a delightful and savory dish that combines the classic comfort of mashed potatoes with the deliciousness of sliced deli turkey, all enveloped in a rich and flavorful turkey gravy. Perfectly crafted for convenience and taste, this recipe is not only a crowd-pleaser but also a fantastic way to transform leftovers into a mouthwatering culinary experience.
Ingredients:
- 3 lbs sliced deli turkey meat:
- You can use your preferred type of deli turkey, whether it’s smoked, roasted, or another variety. Make sure the slices are large enough to hold the mashed potatoes.
- Mashed potatoes (made from your available potatoes):
- Use as many potatoes as needed based on your guest count. Peel and dice the potatoes before boiling until they’re fork-tender. Mash them with butter, milk, salt, and pepper for a creamy texture.
- 3 jars of turkey gravy:
- Store-bought jars of turkey gravy provide convenience. Alternatively, you can make your own gravy using pan drippings from a roasted turkey, turkey stock, flour, and seasonings.
- Salt and pepper to taste:
- Season the mashed potatoes to your liking. You can also add other herbs or spices if you desire.
Instructions:
- Prepare Mashed Potatoes:
- Peel and dice the potatoes into uniform pieces for even cooking.
- Boil the potatoes in salted water until they are fork-tender. This usually takes about 15-20 minutes.
- Drain the potatoes and mash them while they are still hot. Add butter, milk, salt, and pepper to taste. You can also incorporate cream or sour cream for extra richness.
- Assemble the Roll-Ups:
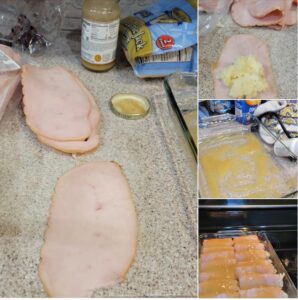
- Lay out the deli turkey slices on a clean and flat surface.
- Spoon a generous amount of mashed potatoes onto each turkey slice, spreading it out evenly.
- Roll and Arrange in Baking Dish:
- Carefully roll up the turkey slices with the mashed potatoes inside, creating neat cylindrical shapes. Place the rolls seam side down in a baking dish.
- Top with Gravy:
- Pour the jars of turkey gravy evenly over the turkey and mashed potato rolls. Ensure that each roll is well-covered with gravy.
- Bake:
- Preheat your oven to 350°F (175°C).
- Bake the turkey and mashed potato roll-ups in the preheated oven for 15 to 20 minutes or until they are heated through. The edges may become slightly golden.
- Serve:
- Carefully remove the baking dish from the oven. Allow it to cool for a few minutes before serving.
- Spoon extra gravy over the top before serving if desired.
Why You’ll Love It:
- Simplicity Meets Deliciousness:
- This recipe combines simplicity and taste, utilizing readily available ingredients to create a flavorful and satisfying dish without the need for extensive preparation.
- Leftover Transformation:
- Perfect for repurposing leftovers, it’s a creative way to breathe new life into sliced deli turkey and mashed potatoes, turning them into a culinary masterpiece.
- Family-Friendly Appeal:
- The melding of turkey, creamy mashed potatoes, and rich gravy caters to a universally loved flavor profile. It’s a family-friendly dish that even the pickiest eaters, like your father-in-law, can’t resist.
- Convenient and Time-Efficient:
- With the use of jarred turkey gravy and deli turkey slices, this recipe is a time-efficient solution that doesn’t compromise on taste. Perfect for busy days when you want a hearty and quick meal.
- Versatility in Presentation:
- The roll-up format adds a touch of elegance to your meal presentation. It’s not just about the taste; it’s about creating a visually appealing dish that can be served at casual family dinners or more formal gatherings.
- Balanced Flavor Explosion:
- The marriage of the savory deli turkey, the creamy mashed potatoes, and the rich turkey gravy creates a well-balanced flavor explosion. Each bite offers a harmonious blend of textures and tastes.
- Customizable and Adaptable:
- Feel free to customize the dish according to your preferences. Add herbs, spices, or additional ingredients to make it your own signature creation.
- Minimal Cleanup:
- Baked in a single dish, this recipe minimizes cleanup efforts, making it even more appealing for those looking for a hassle-free and satisfying meal.
- Warm Comfort Food Vibes:
- The combination of mashed potatoes and turkey, bathed in gravy, invokes a sense of comfort and warmth. It’s the kind of dish that brings a feeling of home to the table.
- Leftover Potential:
- If, by some miracle, you have leftovers of this dish, it’s likely to taste just as delicious the next day. The flavors tend to meld and intensify, making it a great option for a quick and tasty lunch or dinner the day after.
How to store it:
Storing your Turkey and Mashed Potato Roll-Ups properly ensures they stay fresh and safe to eat. Here’s a guide on how to store them:
Short-Term Storage (1-2 Days):
- Refrigeration:
- Allow any leftovers to cool to room temperature.
- Store the roll-ups in an airtight container or cover the baking dish with plastic wrap.
- Place it in the refrigerator promptly.
- Individual Wrap:
- For added freshness, you can individually wrap each roll-up in plastic wrap or aluminum foil before storing them in the refrigerator.
Long-Term Storage (2-3 Days):
- Freezing:
- If you want to store the Turkey and Mashed Potato Roll-Ups for a more extended period, freezing is an option.
- Wrap each roll-up tightly in plastic wrap or aluminum foil to prevent freezer burn.
- Place the individually wrapped roll-ups in a resealable freezer bag or airtight container.
- Label the container with the date for easy tracking.
- Thawing:
- When ready to eat, transfer the frozen roll-ups from the freezer to the refrigerator and allow them to thaw overnight.
- Reheat them in the oven or microwave following the reheating instructions below.
Reheating Instructions:
- Oven:
- Preheat your oven to 350°F (175°C).
- Place the roll-ups in an oven-safe dish and cover with foil to prevent drying.
- Bake for about 20-30 minutes or until heated through.
- Microwave:
- For a quicker option, you can use the microwave.
- Place a single roll-up on a microwave-safe plate, cover with a damp paper towel to retain moisture, and heat in 1-minute increments until thoroughly warmed.
- Check for Doneness:
- Regardless of the method, ensure that the roll-ups are heated to an internal temperature of 165°F (74°C) for safe consumption.
Tips:
- Avoid Overheating:
- To prevent the dish from becoming dry, reheat it just until warmed through. Overheating can result in a loss of moisture.
- Add Extra Gravy:
- If reheating in the oven, consider adding a bit of extra gravy before covering with foil to maintain moisture.
- Quality Check:
- Before serving, check the texture and flavor. If the roll-ups have become too dry, a bit of extra gravy or a drizzle of olive oil can help revive them.


