Ladies and gentlemen, tonight we’re in for a treat as we gather around the dinner table to indulge in a delightful fusion of breakfast and dinner – I present to you, the Breakfast Sliders Extravaganza!
Imagine the sweet and savory symphony of Hawaiian rolls, generously stuffed with layers of fluffy scrambled eggs, perfectly browned breakfast sausage, and a medley of melted cheddar cheese. Each bite is a journey through the comforting flavors of breakfast, now transformed into a dinner sensation.
But that’s not all – these sliders are kissed with a golden blend of melted butter and syrup, creating a mouthwatering glaze that elevates the entire experience. It’s a celebration of flavors, textures, and the sheer joy of bringing the best of breakfast to our evening feast.
Whether you’re a fan of the sweet Hawaiian rolls, a lover of cheesy goodness, or someone who appreciates the comforting warmth of breakfast for dinner, these sliders are sure to win your heart.
So, without further ado, let’s dive into this Breakfast Sliders Extravaganza and savor the magic of a meal that knows no boundaries – where breakfast meets dinner in a culinary symphony on your plate. Bon appétit!
time to cook breakfast sliders:
- Prep Time: The time it takes to prepare and assemble the sliders is around 15-20 minutes, depending on your kitchen efficiency.
- Baking Time: Bake the assembled sliders in a preheated oven at 350°F (175°C) for approximately 15 minutes. Keep an eye on them to ensure they reach your desired level of doneness and the cheese is melted and bubbly.
- Cooling Time: Allow the sliders to cool for a few minutes before slicing. This step helps the flavors settle and makes the sliders easier to handle.
In total, you can expect the entire process, including prep, bake, and cool time, to take around 30-40 minutes. It’s a relatively quick and straightforward recipe, perfect for a delicious dinner. Enjoy your breakfast sliders!
Ingredients:
- One package of Hawaiian rolls, sliced in half
- Hawaiian rolls are sweet and soft, adding a unique flavor to the sliders.
- Cheddar cheese (as much as you’d like)
- Use your favorite cheddar cheese and adjust the quantity based on your preference.
- 10 eggs + 1/2 cup milk (mixed together)
- This forms the scrambled egg mixture, creating a fluffy and creamy layer in the sliders.
- Breakfast sausage (1 pound)
- Choose your preferred breakfast sausage for a savory and hearty filling.
- 1/2 stick of melted butter
- Melted butter adds richness and flavor to the sliders.
- Syrup
- The syrup adds sweetness and a breakfast touch to the sliders. You can use maple syrup or any syrup of your choice.
Instructions:
- Preheat oven to 350°F (175°C):
- Ensure the oven is preheated to the specified temperature for even baking.
- Brown the breakfast sausage:
- Cook the breakfast sausage in a pan until it’s browned and then drain any excess grease. This step ensures the sausage is cooked through and adds a savory element to the sliders.
- Scramble the eggs:
- In a bowl, whisk together 10 eggs and 1/2 cup of milk. Scramble the mixture in a pan until the eggs are fully cooked but still moist.
- Layer the ingredients on the Hawaiian rolls:
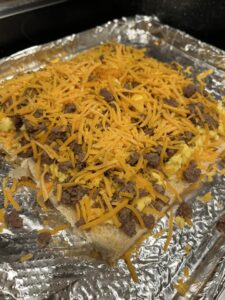
- Lay the bottom half of the Hawaiian rolls in a baking dish. Add a layer of cheddar cheese, followed by the scrambled eggs, browned sausage, and more cheddar cheese.
- Assemble the sliders:
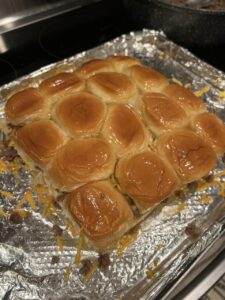
- Place the top half of the Hawaiian rolls back on, creating a sandwich with the layered ingredients.
- Prepare the butter-syrup mixture:
- In a separate bowl, mix together the melted butter and 1/2 cup of syrup. This mixture will be brushed or poured over the sliders, enhancing their flavor.
- Pour the butter-syrup mixture:
- Evenly pour or brush the butter-syrup mixture over the assembled sliders, ensuring a sweet and buttery coating.
- Bake the sliders:
- Bake the sliders in the preheated oven at 350°F (175°C) for approximately 15 minutes or until they reach your desired level of doneness. The cheese should be melted, and the sliders should be golden brown.
- Cool and slice:
- Allow the sliders to cool for a few minutes before slicing them. This helps the flavors meld and makes slicing easier.
- Enjoy:
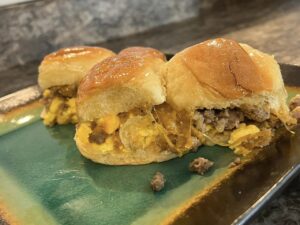
- Slice the sliders into individual portions and enjoy the delightful combination of sweet Hawaiian rolls, cheesy eggs, and savory sausage.
Here are some tips to enhance your experience when making breakfast sliders :
- Customize Ingredients:
- Feel free to customize the ingredients based on your preferences. You can add vegetables like bell peppers or spinach to the eggs, try different types of cheese, or experiment with alternative breakfast meats.
- Fresh Ingredients:
- Use fresh and high-quality ingredients for the best flavor. Fresh eggs, good-quality sausage, and flavorful cheese will make a noticeable difference.
- Hawaiian Rolls Variation:
- While Hawaiian rolls add a sweet touch, you can also try different types of rolls or buns based on your taste preferences. Brioche buns or slider rolls can be good alternatives.
- Cheese Choices:
- Experiment with different cheeses to add variety. Sharp cheddar, pepper jack, or Swiss cheese can all bring unique flavors to the sliders.
- Serving with Sides:
- Consider serving the sliders with side dishes like a simple green salad, fruit, or hash browns to create a well-rounded meal.
- Spice it Up:
- Add a bit of spice by incorporating ingredients like hot sauce, diced jalapeños, or a pinch of cayenne pepper to the egg mixture for those who enjoy a kick of heat.
- Make-Ahead Option:
- Prepare the sliders in advance, cover them, and refrigerate until you’re ready to bake. This can be a time-saver for busy evenings.
- Cooking Time Adjustment:
- Keep an eye on the sliders while baking to prevent overcooking. Adjust the baking time if needed based on your oven’s characteristics.
- Dipping Sauce:
- Consider serving the sliders with a dipping sauce on the side, such as extra syrup mixed with a touch of Dijon mustard or hot sauce for added flavor.
- Variation for Kids:
- If making these for kids, you can involve them in the process by letting them choose their favorite ingredients or even assembling their own sliders.
- Portion Control:
- If serving at a gathering or party, you can cut the sliders into smaller pieces to make them bite-sized and more manageable for guests.
- Freezing Extras:
- If you have leftovers, you can freeze them for later. Just ensure they are properly wrapped to maintain freshness.
How to store breakfast sliders:
Storing breakfast sliders properly will help maintain their freshness. Here’s how you can store them:
- Refrigeration:
- If you have leftover sliders, it’s best to refrigerate them. Allow the sliders to cool to room temperature, then place them in an airtight container or wrap them tightly with plastic wrap.
- Labeling and Date:
- Consider labeling the container with the date of preparation. This can help you keep track of freshness and ensure you consume them within a recommended timeframe.
- Reheating:
- To reheat, you can use an oven or toaster oven to preserve the texture of the sliders. Preheat the oven to a low temperature (around 300°F or 150°C), cover the sliders with aluminum foil to prevent drying out, and heat for about 10-15 minutes or until warmed through.
- Freezing (Optional):
- If you want to store sliders for a more extended period, consider freezing them. Wrap individual sliders or the entire batch tightly in plastic wrap and then in aluminum foil. Place them in a freezer-safe bag. Label the package with the date.
- To thaw and reheat, remove the sliders from the freezer and let them thaw in the refrigerator overnight. Reheat as mentioned above.
- Avoid Refrigerating Unbaked Sliders:
- If you want to prepare the sliders in advance but don’t want to bake them immediately, it’s better to refrigerate the individual components (cooked sausage, scrambled eggs, etc.) separately. Assemble and bake when you’re ready to enjoy.


